# 基础
Maven是appache下的开源项目,项目管理工具,管理Java项目
- 本地仓库:第一次会从远程仓库下载jar包,保存在本地。下次先从本地找,找不到再去远程仓库找
- 远程仓库:自己架设的仓库,对外公开
- 中央仓库 (opens new window):maven团队维护的仓库,用户只能下载,不能添加
# 安装配置
第一步 下载maven
- 官方下载链接 (opens new window)
- Binary可执行版本,已编译好的可以直接使用
- Source源代码版本,需自己编译成可执行软件才可使用
- 我们选择已经编译好的windows版本进行安装:选择zip版本(linux选择tar.gz)
第二步 maven环境配置
- 系统变量:
MAVEN_HOME=D:\maven\apache-maven-3.8.4 - 变量Path:添加
%MAVEN_HOME%\bin - 验证maven环境配置是否成功:
mvn -version
- 系统变量:
第三步 配置maven仓库以及相关设置
- 配置maven仓库,创建一个maven仓库目录
- 配置settings.xml:
//找到节点localRepository,在注释外添加自己仓库的地址 <localRepository>D:\JAVA\apache-maven\apache-maven-3.8.5</localRepository> //配置阿里云镜像 <mirror> <id>alimaven</id> <mirrorOf>central</mirrorOf> <name>aliyun maven</name> <url>http://maven.aliyun.com/nexus/content/repositories/central/</url> </mirror> //配置JDK <profile> <id>jdk-1.8</id> <activation> <activeByDefault>true</activeByDefault> <jdk>1.8</jdk> </activation> <properties> <maven.compiler.source>1.8</maven.compiler.source> <maven.compiler.target>1.8</maven.compiler.target> <maven.compiler.compilerVersion>1.8</maven.compiler.compilerVersion> </properties> </profile> - 配置完成。输入命令:
mvn help:system测试
第四步 添加maven到我们的IDEA中
- 点击File的setting,设置IDEA的maven指向我们自己的maven地址

- 点击File的setting,设置IDEA的maven指向我们自己的maven地址
# 项目结构
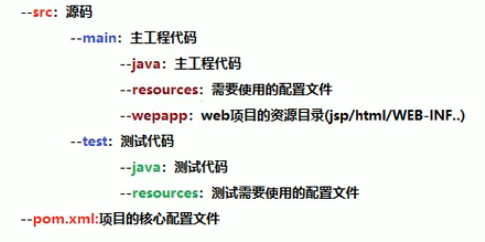
- test目录发布时不会被打包
- 手动添加的resources文件夹需要点击右键Mark Directory as -> Resources Root
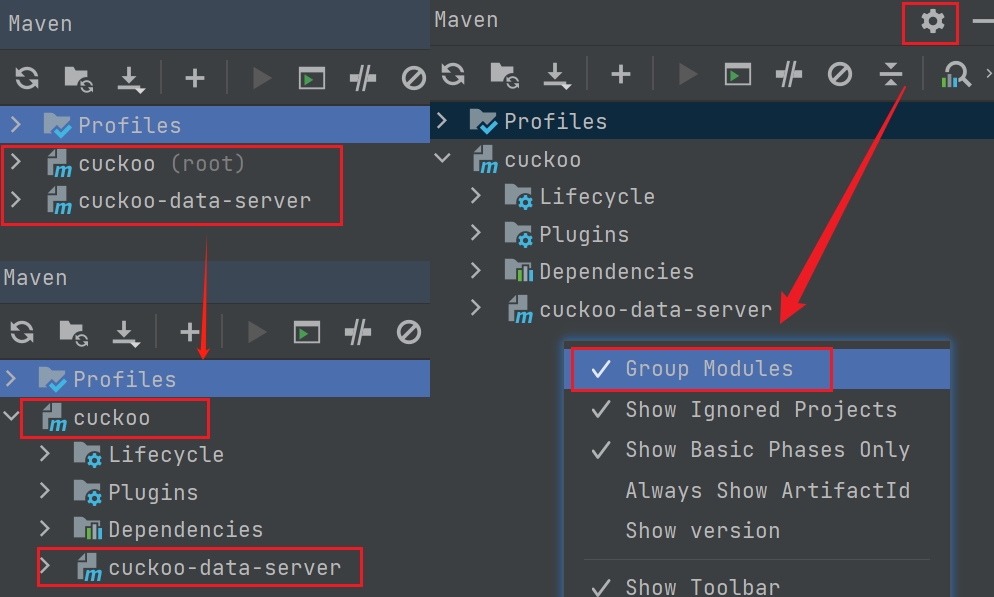
# 父工程与子模块显示在同一层级
# 常用命令
在生命周期中,执行后边的命令,会自动执行前面的命令
- clean:清除编译的target目录
- compile:编译命令,将src/main/java下的文件编译为class文件输出到target目录下
- test:运行所有的测试方法
- package:打包命令,在target目录下会出现war包/jar包
- install:将当前项目安装到本地仓库中,其他项目引用本项目的jar包时不用去私服上下载jar包
# 创建项目
- Java项目:archetype(骨架) -> maven-archetype-quickstart
- WEB项目:archetype(骨架) -> maven-archetype-webapp
- MVC项目:先创建WEB项目,Project Structure - Modules - 添加Java/Resource文件夹 - Mask as
# Pom.xml配置
- 依赖项:资源的唯一标识(groupId->atifactId->version maven中的路径)
- groupId:组织名 org.example
- atifactId:模块名称 maven-test1
- version:版本号
- packaging:打包类型 war/jar/pom
- scope:依赖范围
- 插件
- Alt+Insert 快捷键添加
<build>
  <plugins>
  	<plugin>
  		<groupId>org.apache.tomcat.maven</groupId>
  		<artifactId>tomcat7-maven-plugin</artifactId>
  		<version>2.2</version>
  		<configuration>
  		  <port>80</port>
  		  <path>/</path>
  		</configuration>
  	  </plugin>
  </plugins>
<build>
# 依赖范围
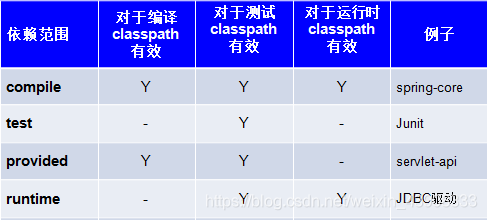
- compile 编译、测试、运行
- 比如:strus-core、spring-beans
- 打到war包或jar包
- provided 编译、测试有效
- 比如:servlet-api就是编译和测试有用,在运行时不用(tomcat容器已提供)。
- 不会打到war包
- runtime:运行、测试有效
- 比如:jdbc驱动包,在开发代码中针对java的jdbc接口开发,编译不用,在运行和测试时需要通过jdbc驱动包(mysql驱动)连接数据库
- 会打到war包
- test:只是测试有效,只在单元测试类中用
- 比如:junit
- 不会打到war包
<dependency>
	<groupId>mysql</groupId>
	<artifactId>mysql-connector-java</artifactId>
	<version>5.1.6</version>
	<scope>runtime</scope>
</dependency>
<dependency>
	<groupId>javax.servlet</groupId>
	<artifactId>servlet-api</artifactId>
	<version>2.5</version>
	<scope>provided</scope>
</dependency>
注意
- 如果是compile就不需要设置了,因为compile是scope的默认值
- Tomcat中包含servlet-api,所以设置为provided,防止运行时有冲突
# pom.xml 中的 scope import 解析
使用 scope import 可以解决 Maven 的单继承问题
Maven 本身支持继承,很多时候我们会创建多模块项目,而多个模块会引入相同的依赖项,这个时候我们就可以使用 Maven 的父子工程结构。创建一个父 pom.xml,其他项目中的 pom.xml 文件继承父 pom.xml,子模块的 pom.xml 的内容如下图所示:
<parent>
    <groupId>com</groupId>
	<artifactId>springboot_dubbo</artifactId>
	<version>0.0.1-SNAPSHOT</version>
</parent>
通过上面这种方式,就可以使我们的依赖项管理更加调理。但是 Maven 父子项目结构和 Java 继承一样,都是单继承,一个子项目只能制定一个父 pom ,很多时候,我们需要打破这种单继承。
例如使用 spring-boot 的时候,官方推荐的方式是继承父 pom ,如下图所示:
<parent>
    <groupId>org.springframework.boot</groupId>
	<artifactId>spring-boot-starter-parent</artifactId>
	<version>2.1.4.RELEASE</version>
</parent>
但是如果项目中已经有了其他父 pom ,又想用 spring-boot 怎么办?这个时候就需要使用 scope import ,还需要指定 type pom ,如下图所示:
<dependencyManagement>
    <dependencies>
        <dependency>
            <groupId>org.springframework.boot</groupId>
            <artifactId>spring-boot-starter-parent</artifactId>
            <version>2.1.4.RELEASE</version>
            <scope>import</scope>
            <type>pom</type>
        </dependency>
    </dependencies>
</dependencyManagement>
注意
scope import 只能在 dependencyManagement 模块中使用
# 将项目本身编译并打包到本地仓库
将下载的jar包放到一个你知道的位置,比如我放在D:/maven/repository/ojdbc6.jar 然后打开cmd,执行mvn install:install-file -Dfile=/D:/maven/repository/ojdbc6.jar -DgroupId=com.oracle -DartifactId=ojdbc6 -Dversion=11.2.0.1.0 -Dpackaging=jar -DgeneratePom=true

命令中的参数具体指的是什么内容:
- install:可以将项目本身编译并打包到本地仓库
- install-file:安装文件
- Dfile=D:\ojdbc6.jar:指定要打的包的文件位置
- DgroupId=com.oracle:指定当前包的groupId为com.oracle
- DartifactId=ojdbc6:指定当前的artifactfactId为ojdbc6
- Dversion=11.2.0.1.0:指定当前包的版本为11.2.0.1.0
- DgeneratePom=true:是否生成pom文件
根据install位置找到需要的jar,将他放在你的maven本地仓库指定路径D:\maven\repository\com\oracle\ojdbc\ojdbc6\11.2.0.1.0,最后我们引入就好了
# 修改项目的打包名称
<build>
  <!-- 服务打包的最终名称 -->
  <finalName>app</finalName>
  <plugins>
    <plugin>
      <groupId>org.springframework.boot</groupId>
      <artifactId>spring-boot-maven-plugin</artifactId>
    </plugin>
  </plugins>
</build>
# 高级
# 分模块开发
将原始模块按照功能拆分成若干个子模块,项目中的每一层都可以单独维护,也可以很方便的被别人使用

- ssm_pojo项目中创建com.itheima.domain包,并将maven_02_ssm中Book类拷贝到该包中
- 删除原项目ssm中的domain包
- 在ssm项目的pom.xml添加ssm_pojo的依赖
<dependency>
    <groupId>com.itheima</groupId>
    <artifactId>ssm_pojo</artifactId>
    <version>1.0-SNAPSHOT</version>
</dependency>
- 使用maven的install命令,把其安装到Maven的本地仓库中
- 再次执行ssm的compile的命令后,就已经能够成功编译
# 依赖管理
依赖指当前项目运行所需的jar,一个项目可以设置多个依赖
<!--设置当前项目所依赖的所有jar-->
<dependencies>
    <!--设置具体的依赖-->
    <dependency>
        <!--依赖所属群组id-->
        <groupId>org.springframework</groupId>
        <!--依赖所属项目id-->
        <artifactId>spring-webmvc</artifactId>
        <!--依赖版本号-->
        <version>5.2.10.RELEASE</version>
    </dependency>
</dependencies>
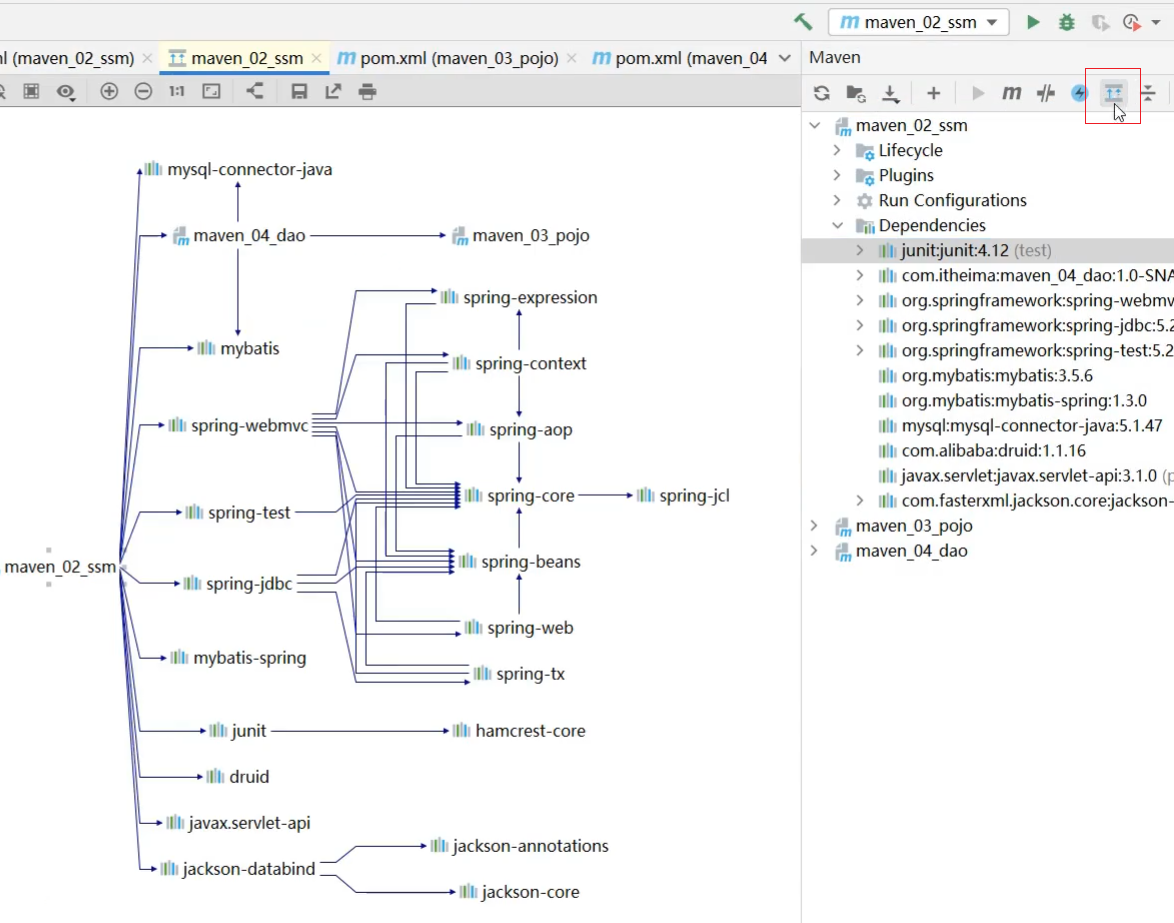
# 依赖传递
- 依赖中箭头 > 的含义:这个依赖还依赖了其他依赖
- 依赖是具有传递性的。可以把maven_02_ssm项目中pom.xml关于maven_03_pojo的依赖注释或删除掉

# 依赖冲突
这里所说的依赖冲突是指项目依赖的某一个jar包,有多个不同的版本,因而造成类包版本冲突
- 同级特殊优先:当同级配置了相同资源的不同版本,后配置的覆盖先配置的
- 不同级路径优先:当依赖中出现相同的资源时,层级越深,优先级越低,层级越浅,优先级越高
- 如果想更全面的查看Maven中各个坐标的依赖关系,可以点击Maven面板中的show Dependencies
# 可选依赖和排除依赖
- 可选依赖指对外隐藏当前所依赖的资源---不透明
<!--在maven_04_dao的pom.xml,在引入maven_03_pojo的时候,添加optional-->
<dependency>
    <groupId>com.itheima</groupId>
    <artifactId>maven_03_pojo</artifactId>
    <version>1.0-SNAPSHOT</version>
    <!--可选依赖是隐藏当前工程所依赖的资源,隐藏后的资源不再具有依赖传递性-->
	<!--当前项目可用,引用当前项目的不再能用-->
    <optional>true</optional>
</dependency>
- 排除依赖指主动断开依赖的资源,被排除的资源无需指定版本---不需要
<dependency>
    <groupId>com.itheima</groupId>
    <artifactId>maven_04_dao</artifactId>
    <version>1.0-SNAPSHOT</version>
    <!--已经有依赖的事实,排除依赖是隐藏对当前资源的依赖关系-->
    <exclusions>
        <exclusion>
            <groupId>com.itheima</groupId>
            <artifactId>maven_03_pojo</artifactId>
        </exclusion>
    </exclusions>
</dependency>
# 聚合
- 聚合:将多个模块组织成一个整体,同时进行项目构建的过程称为聚合
- 聚合工程:通常是一个不具有业务功能的"空"工程(有且仅有一个pom文件)
具体实现 :
- 创建一个空的maven项目
- 将项目的打包方式改为pom
<?xml version="1.0" encoding="UTF-8"?>
<project xmlns="http://maven.apache.org/POM/4.0.0"
         xmlns:xsi="http://www.w3.org/2001/XMLSchema-instance"
         xsi:schemaLocation="http://maven.apache.org/POM/4.0.0
		                     http://maven.apache.org/xsd/maven-4.0.0.xsd">

    <modelVersion>4.0.0</modelVersion>

    <groupId>com.itheima</groupId>
    <artifactId>maven_01_parent</artifactId>
    <version>1.0-RELEASE</version>
    <packaging>pom</packaging>

</project>
项目的打包方式,我们接触到的有三种,分别是
- jar:默认情况,说明该项目为java项目
- war:说明该项目为web项目
- pom:说明该项目为聚合或继承(后面会讲)项目
- pom.xml添加所要管理的项目
<?xml version="1.0" encoding="UTF-8"?>
<project xmlns="http://maven.apache.org/POM/4.0.0"
         xmlns:xsi="http://www.w3.org/2001/XMLSchema-instance"
         xsi:schemaLocation="http://maven.apache.org/POM/4.0.0
		                     http://maven.apache.org/xsd/maven-4.0.0.xsd">

    <modelVersion>4.0.0</modelVersion>

    <groupId>com.itheima</groupId>
    <artifactId>maven_01_parent</artifactId>
    <version>1.0-RELEASE</version>
    <packaging>pom</packaging>

    <!--设置管理的模块名称,module顺序不重要,系统会根据依赖关系来自动决定执行的顺序-->
	<!--各模块都在当前pom.xml的父目录一级-->
    <modules>
        <module>../maven_02_ssm</module>
        <module>../maven_03_pojo</module>
        <module>../maven_04_dao</module>
    </modules>
</project>
# 继承
与java中的继承相似,子工程可以继承父工程中的配置信息,常见于依赖关系的继承
实现步骤:
- 创建Maven模块,设置打包类型为pom
- 在父工程的pom文件中配置共用的依赖,一般只抽取子项目中公有的jar包
<dependencies>
    <dependency>
        <groupId>org.springframework</groupId>
        <artifactId>spring-webmvc</artifactId>
        <version>5.2.10.RELEASE</version>
    </dependency>
    ...
</dependencies>
- 在父工程中配置依赖管理,提供可选择的依赖资源,让子工程中可以按需引用
<dependencyManagement>
    <dependencies>
        <dependency>
            <groupId>com.alibaba</groupId>
            <artifactId>druid</artifactId>
            <version>1.1.16</version>
        </dependency>
    </dependencies>
    ...
</dependencyManagement>
- 在子工程中配置当前工程所继承的父工程
<!--定义该工程的父工程-->
<parent>
    <groupId>com.itheima</groupId>
    <artifactId>maven_01_parent</artifactId>
    <version>1.0-RELEASE</version>
    <!--快速找到父工程的pom文件的相关路径,可以不写-->
    <relativePath>../maven_01_parent/pom.xml</relativePath>
</parent>
- 在子工程中配置使用父工程中可选依赖的坐标,别配版本
<dependencies>
    <dependency>
        <groupId>com.alibaba</groupId>
        <artifactId>druid</artifactId>
    </dependency>
</dependencies>
# 属性
- 父工程中定义属性
<properties>
    <spring.version>5.2.10.RELEASE</spring.version>
    <junit.version>4.12</junit.version>
    <mybatis-spring.version>1.3.0</mybatis-spring.version>
</properties>
- 修改依赖的version
<dependency>
    <groupId>org.springframework</groupId>
    <artifactId>spring-core</artifactId>
    <version>${spring.version}</version>
</dependency>
<dependency>
    <groupId>org.springframework</groupId>
    <artifactId>spring-webmvc</artifactId>
    <version>${spring.version}</version>
</dependency>
<dependency>
    <groupId>org.springframework</groupId>
    <artifactId>spring-jdbc</artifactId>
    <version>${spring.version}</version>
</dependency>
# 配置文件加载属性
- 父工程定义属性
<properties>
   <jdbc.url>jdbc:mysql://127.1.1.1:3306/ssm_db</jdbc.url>
</properties>
- jdbc.properties文件中引用属性
<!--在jdbc.properties,将jdbc.url的值直接获取Maven配置的属性-->
jdbc.driver=com.mysql.jdbc.Driver
jdbc.url=${jdbc.url}
jdbc.username=root
jdbc.password=root
- 设置maven过滤文件范围
<!--Maven在默认情况下是从当前项目的src\main\resources下读取文件进行打包-->
<!--现在我们需要打包的资源文件是在maven_02_ssm下,需要我们通过配置来指定下具体的资源目录-->
<build>
    <resources>
        <!--设置资源目录-->
        <resource>
		     <!--
			${project.basedir}: 当前项目所在目录,相当于所有的子项目都添加了资源目录的过滤
             -->
            <directory>${project.basedir}/src/main/resources</directory>
            <!--设置能够解析${},默认是false -->
            <filtering>true</filtering>
        </resource>
    </resources>
</build>
- 打包的过程中如果报缺少web.xml
- 解决方案1:在maven_02_ssm项目的src\main\webapp\WEB-INF\添加一个web.xml文件
<?xml version="1.0" encoding="UTF-8"?> <web-app xmlns="http://xmlns.jcp.org/xml/ns/javaee" xmlns:xsi="http://www.w3.org/2001/XMLSchema-instance" xsi:schemaLocation="http://xmlns.jcp.org/xml/ns/javaee http://xmlns.jcp.org/xml/ns/javaee/web-app_3_1.xsd" version="3.1"> </web-app>- 解决方案2: maven_02_ssm配置maven打包war时,忽略web.xml检查,failOnMissingWebXml
<build>
    <plugins>
        <plugin>
            <groupId>org.apache.maven.plugins</groupId>
            <artifactId>maven-war-plugin</artifactId>
            <version>3.2.3</version>
            <configuration>
                <failOnMissingWebXml>false</failOnMissingWebXml>
            </configuration>
        </plugin>
    </plugins>
</build>
# 版本
- SNAPSHOT(快照版本):项目开发过程中临时输出的版本,称为快照版本
- RELEASE(发布版本)
- alpha版:内测版,bug多不稳定内部版本不断添加新功能
- beta版:公测版,不稳定(比alpha稳定些),bug相对较多不断添加新功能
- 纯数字版
# 多环境开发
- 父工程配置多个环境,并指定默认激活环境
<profiles>
    <!--开发环境env_dep-->
    <profile>
        <id>env_dep</id>
        <properties>
            <jdbc.url>jdbc:mysql://127.1.1.1:3306/ssm_db</jdbc.url>
        </properties>
        <!--设定是否为默认启动环境-->
        <activation>
            <activeByDefault>true</activeByDefault>
        </activation>
    </profile>
    <!--生产环境env_pro-->
    <profile>
        <id>env_pro</id>
        <properties>
            <jdbc.url>jdbc:mysql://127.2.2.2:3306/ssm_db</jdbc.url>
        </properties>
		<!--设定是否为默认启动环境-->
		<activation>
			<activeByDefault>true</activeByDefault>
		</activation>
    </profile>
    <!--测试环境env_test-->
    <profile>
        <id>env_test</id>
        <properties>
            <jdbc.url>jdbc:mysql://127.3.3.3:3306/ssm_db</jdbc.url>
        </properties>
    </profile>
</profiles>
- 命令行实现环境切换
mvn 指令 -P 环境定义ID[环境定义中获取]
mvn install -P env_test
# 跳过测试
- 方式一:IDEA工具实现跳过测试按钮Toggle'Skip Tests'
- 方式二:配置插件实现跳过测试
<build>
    <plugins>
        <plugin>
            <!--maven测试插件,因为是内部插件,所以不用提高groupId-->
            <artifactId>maven-surefire-plugin</artifactId>
            <version>2.12.4</version>
            <configuration>
                <skipTests>false</skipTests>
                <!--
				skipTests:如果为true,则跳过所有测试,如果为false,则不跳过测试
				excludes:哪些测试类不参与测试,即排除,针对skipTests为false来设置的
				includes: 哪些测试类要参与测试,即包含,针对skipTests为true来设置的
				-->
                <excludes>
                    <exclude>**/BookServiceTest.java</exclude>
                </excludes>
            </configuration>
        </plugin>
    </plugins>
</build>
- 方式三:命令行跳过测试
mvn 指令 -D skipTests
mvn package -D skipTests
# 私服
私服是一台独立的服务器,用于解决团队内部的资源共享与资源同步问题
Nexus是Sonatype公司的一款maven私服产品 下载地址 (opens new window)
- 使用cmd进入到解压目录下的bin,执行如下命令启动nexus服务器
nexus.exe /run nexus
- 访问地址为
http://localhost:8081
- 首次登录重置密码
用户名:admin 密码:根据登录提示进入文件查看初始密码
- 修改基础配置信息
etc目录中nexus-default.properties
注意
安装路径不能有中文
# 私服仓库的分类
- 宿主仓库hosted(用于上传)
- 小组内自己用的,自主研发的
- 无法从中央仓库获取的资源,比如Oracle,因为是付费产品,所以中央仓库没有
- 代理仓库proxy(用于下载)
- 所有项目组公用的,仓库组内只有一个
- 代理远程仓库,转调中央仓库,通过nexus访问中央仓库
- 仓库组group(用于下载)
- 将若干个仓库组成一个群组,用来打包下载
- 仓库组不能保存资源,属于设计型仓库

# 本地仓库访问私服配置
- 私服上配置仓库:创建名为xxx-snapshot和xxx-release宿主仓库hosted
- 配置本地Maven对私服的访问权限
<!--在本地Maven的配置文件settings.xml中进行配置-->
<servers>
    <server>
        <id>itheima-snapshot</id>
        <username>admin</username>
        <password>admin</password>
    </server>
    <server>
        <id>itheima-release</id>
        <username>admin</username>
        <password>admin</password>
    </server>
</servers>
- 配置私服的访问路径
<!--在本地Maven的配置文件settings.xml中进行配置-->
<mirrors>
    <mirror>
        <!--配置仓库组的ID-->
        <id>maven-public</id>
        <!--*代表所有内容都从私服获取-->
        <mirrorOf>*</mirrorOf>
        <!--私服仓库组maven-public的访问路径-->
        <url>http://localhost:8081/repository/maven-public/</url>
    </mirror>
</mirrors>

# 私服资源上传与下载
- 配置工程上传私服的具体位置
 <!--配置当前工程保存在私服中的具体位置-->
<distributionManagement>
    <repository>
        <!--和maven/settings.xml中server中的id一致,表示使用该id对应的用户名和密码-->
        <id>itheima-release</id>
         <!--release版本上传仓库的具体地址-->
        <url>http://localhost:8081/repository/itheima-release/</url>
    </repository>
    <snapshotRepository>
        <!--和maven/settings.xml中server中的id一致,表示使用该id对应的用户名和密码-->
        <id>itheima-snapshot</id>
        <!--snapshot版本上传仓库的具体地址-->
        <url>http://localhost:8081/repository/itheima-snapshot/</url>
    </snapshotRepository>
</distributionManagement>
- 发布资源到私服或者执行Maven命令
mvn deploy
- 现在发布是在itheima-snapshot仓库中,如果想发布到itheima-release仓库中就需要将父工程和子模块parent标签里继承父工程parent中的version修改成RELEASE即可。
<groupId>com.itheima</groupId>
<artifactId>maven_01_parent</artifactId>
<version>1.0-RELEASE</version>
<packaging>pom</packaging>


<parent>
    <groupId>com.itheima</groupId>
    <artifactId>maven_01_parent</artifactId>
    <version>1.0-RELEASE</version>
    <!--快速找到父工程的pom文件的相关路径,可以不写-->
    <relativePath>../maven_01_parent/pom.xml</relativePath>
</parent>
注意
要发布的项目都需要配置分配管理distributionManagement标签,要么在自己的pom.xml中配置,要么在其父项目中配置,然后子项目中继承父项目即可
# 私服配置阿里云镜像
如果私服中没有对应的jar,会去中央仓库下载,速度很慢。可以配置让私服去阿里云中下载依赖。

← 常用方法